Introduction to C++, Installing VS Code, g++ & more
In these C++ tutorials, we are going to learn the C++ programming language. First of all, I am going to explain how these C++ tutorials will differ from other sources of learning C++:
- These C++ tutorials will cover everything in C++ from beginning to the end.
- No repetitive and useless stuff
- Enjoyable and easy to learn.
- I have designed this C++ course for absolute beginners.
- No prior programming knowledge required.
- The course will include quizzes with solutions.
Here is the content outline which we are going to cover in today's C++ tutorial:
- What is programming, and why C++?
- Installation of Visual Studio Code
- Installation of g++
- Writing our first program and executing it
- What is Programming and Why C++?
Before starting this C++ tutorial, we should know the reason behind learning a programming language? Let me answer this fundamental question for you. A programming language helps a user to communicate with the computer properly. For example, if a person wants to talk to another person, he must learn a language (like English, Hindi, Bangla, etc.), which another person can understand. If a human wants to talk to the computer or give some instructions, he has to learn a language which computers can understand. There are many languages that computers can understand, like python, java, and C++.
As we are going to learn C++ in this set of tutorials - here arises another essential question: why learn C++ despite it being an ancient programming language? Bjarne Stroustrup developed C++ as an addition to C language. The main reason to use C++ is that it is very close to the hardware, which means that it is beneficial for the programmer to give direct instructions to a device without using any intermediate medium. Another reason to use C++ is that it is an object-oriented programming language, and object-oriented languages can create complex real-world software systems. Well, we will dive very deep into OOPs and inheritance later in this course!
- Installation of Visual Studio Code
Visual studio is a source code editor - free to use, provided & maintained by Microsoft. Below is the process of downloading and installing visual studio code:
Step 1: Go to Google and search "VS Code install" and click on the Visual studio link as shown in the image below
Step 2: Click on the user installer to download visual studio code according to the operating system in use
Step 3: After downloading open the program and click next to install the Visual studio code IDE.
- Installation of g++
g++ is a compiler that helps us convert our source code into a .exe file. Below is the process of downloading and installing g++:
Step 1: Go to Google and search "MinGW install" and click on the MinGW link, as shown in the image below.
Step 2: Click on the download button on the top right corner menu.
Step 3: After visiting the download page, click on the windows button as shown in the image below to start the downloading
Step 4: After the download - open the program and click "Continue" to start the installation process.
Step 5: After downloading some packages, it will show you a screen, as shown in the image below. You have to mark both the boxes as in the image below, and then click on installation on the top left corner menu. Finally, click apply changes, and it will start downloading the required packages.
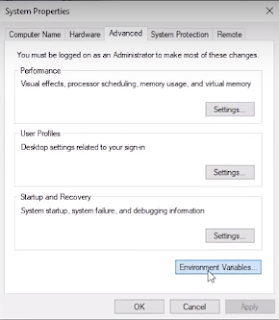
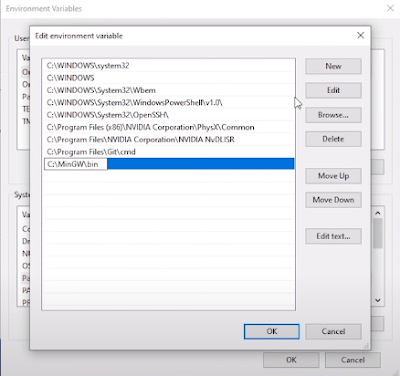
Step 7: Now right-click on this pc and go to properties
Step 8: After that click on advanced system settings as shown in the image below
Writing Our First Program and Executing It
To write our first program, we need Visual studio code, which is a source code editor. Create a folder and then right-click inside the folder and click on "open with code" as shown below:
Following these steps will open your visual studio code with that folder as the context. After opening the VS Code, you have to install some extensions. Go to the extension menu and search "C/C++," and it will show you this extension. C/C++, as well as the other extensions we add, will make our life easy while learning C++. Click on the install button, and it will start installing the extension for you, as shown in the image below.
This extension will help us in writing code through features such as auto-complete or auto-dropdown suggestions. Let us install one more extension, which will help us run our programs quickly. Go to the Extensions tab in the top left corner and search "Code runner." After that, click on install.
Now we have to create our program file and start writing our code. To create a program file, you have to go to the File menu > then click on the file button, as shown in the image below.
After clicking on the file button, it will ask you for the file name. Give the name of the file as "tutorial1.cpp" and press enter. Now the code file will be created, and you can start writing your program.
In today's tutorial, we are not going to learn anything about what this code is all about. We will learn these things step by step in our upcoming lectures. Now to execute this code, press the run button, as shown in the image above, and it will give you the output as shown in the image below.
Congratulations! You have successfully created and executed your first C++ program. We will go to the next video and see the basic structure of a C++ program. I hope you are enjoying this course!
Code as described/written in the video
#include<iostream>


int main(){
    std::cout<<"Hello World";
    return 0;
}


